
Every pair of eyes tells a story, and smoky eyes add an element of mystery and allure to that tale. The good news? Achieving that mesmerizing smoky eye look doesn’t need to be a mystery anymore. With a bit of patience, a touch of creativity, and a dash of confidence, you can transform your gaze into something utterly captivating. Let’s embark on this makeup adventure together, step by step.Mastering Smoky Eyes:
Step 1: Gather Your Arsenal
Imagine you are an artist, and your eyes are the canvas. First things first, gather your tools: a good quality eyeshadow palette with shades ranging from light to dark, an eye primer to make the colors pop, a blending brush, and a smudge brush. And, of course, don’t forget some makeup remover and cotton swabs for any touch-ups.
Step 2: Prime Your Canvas
Just as a painter primes their canvas, you need to prime your eyelids. Apply a thin layer of eye primer to create a smooth base for your eyeshadow. This step ensures your smoky eyes stay put all night long, no matter where your adventures take you.
Step 3: Lay Down the Base
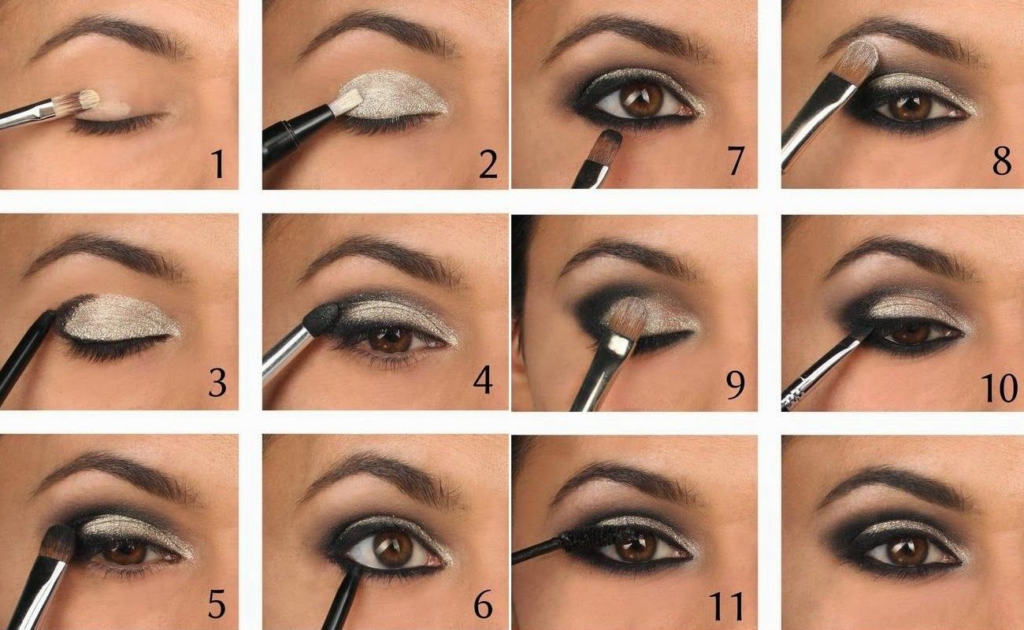
Choose a neutral shade from your eyeshadow palette that matches your skin tone. Apply this as a base across your eyelids, from lash line to brow bone. This neutral canvas will make it easier to blend the darker shades later on.
Step 4: Introduce the Drama
Now, it’s time to dive into the darker shades. Pick a medium-toned eyeshadow – think charcoal, deep brown, or plum. With your blending brush, apply the color to your eyelid, concentrating on the outer corner. Blend the color in small circular motions, working your way towards the center of your eyelid. The key here is to blend, blend, and blend some more for that seamless, smoky effect.
Step 5: Deepen the Shadows
To intensify the smokiness, choose a darker shade from your palette – a rich black or a deep, sultry color. With your smudge brush, apply this darker shade close to your lash line, both on your upper and lower lids. Blend it gently to avoid harsh lines, creating a gradient effect.
Step 6: Highlight the Inner Corners
Bring light to your smoky eyes by applying a shimmering or matte highlighter to the inner corners of your eyes. This touch of brightness not only adds depth but also makes your eyes appear larger and more awake.
Step 7: Luscious Lashes and Final Touches
Curl your lashes and apply your favorite mascara generously. You can even add false lashes for that extra va-va-voom. Clean up any fallout under your eyes with makeup remover and a cotton swab. And there you have it – your smoky eyes are ready to mesmerize the world!
Remember, like any form of art, practice makes perfect. Don’t be afraid to experiment with different shades and techniques until you find the smoky eye look that truly reflects your unique style and personality. So, go ahead, embrace the allure, and let your eyes tell a story of confidence, mystery, and undeniable charm. Happy smoky eye adventures!